Introduction
If you’ve ever placed a trade near support or resistance, only to watch price spike against you, hit your stop-loss, and then move perfectly in your original direction, you’ve likely experienced a Liquidity Sweep.
This is not random.
It’s a deliberate market behavior where smart money hunts retail stop-losses to collect liquidity before initiating the real move.
In this blog, you’ll learn:
- What Liquidity Sweeps (SL Hunting) really are
- Why do they happen near Support & Resistance
- How to identify them on charts
- How to combine them with RSI, EMA Crossovers, and Supertrend
- A complete entry framework you can use in real trading
Let’s break it down.
What Is a Liquidity Sweep?
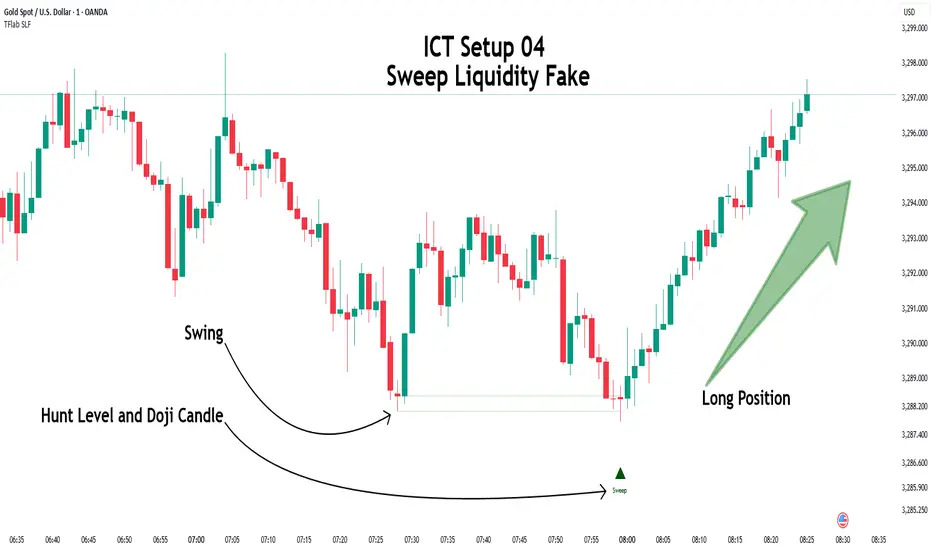
A Liquidity Sweep (also called Stop-Loss Hunting) happens when the price temporarily breaks a key support or resistance level to trigger clustered stop-loss orders and pending entries then quickly reverses.
Retail traders usually place stops:
- Below support (for longs)
- Above resistance (for shorts)
- Above equal highs / below equal lows
Institutions and large players need liquidity to enter big positions. Those retail stops are the liquidity.
So price is pushed into those zones first, not to continue but to fill large orders cheaply.
Once liquidity is collected, the real directional move begins.
Why Liquidity Sweeps Form Near Support & Resistance
Support and resistance zones naturally attract:
- Breakout traders
- Stop-loss placements
- Pending orders
This creates high liquidity pools.
Smart money targets these areas because:
✅ Maximum orders available
✅ Minimal slippage for large entries
✅ Retail emotions peak here (fear & FOMO)
That’s why you’ll often see:
- Fake breakouts
- Long wicks
- Sudden spikes
- Fast reversals
All classic signs of liquidity grabs.
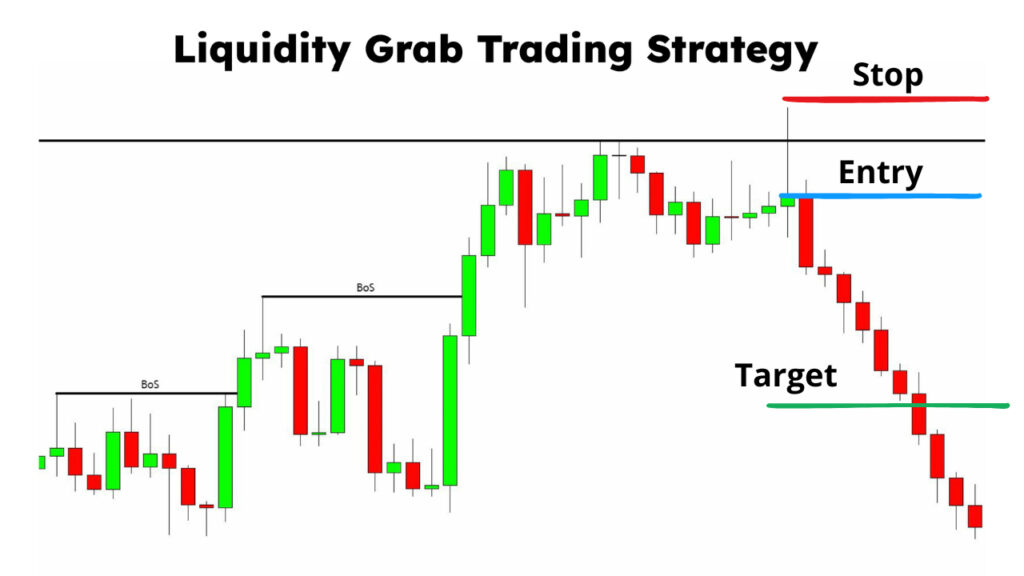
Typical Structure of an SL Hunt Setup
A textbook liquidity sweep looks like this:
- Price approaches Support/Resistance
- Quick breakout beyond the level
- Stops get triggered
- Candle closes back inside the range
- Strong move starts in the opposite direction
This is called a false breakout with displacement.
The Core Trading Idea
Never trade the breakout. Trade the rejection AFTER liquidity is taken.
Instead of chasing moves, wait for:
- Sweep
- Rejection
- Confirmation
- Entry
Patience here changes everything.
Entry Strategy Using Multiple Confirmations
Liquidity sweeps alone are powerful, but combining them with indicators increases accuracy dramatically.
Here’s a professional framework:
Step 1 – Identify Key Support / Resistance
Mark:
- Previous day high/low
- Equal highs / equal lows
- Range boundaries
- Supply / demand zones
These are your liquidity magnets.
Step 2 – Wait for Liquidity Sweep
Look for:
✅ Wick beyond level
✅ Candle closes back inside
✅ Volume spike (optional)
✅ Immediate rejection
No sweep = no trade.
Step 3 – Add Indicator Confirmation
Now combine with ANY of the following:
RSI Confirmation
For Shorts:
- Sweep above the resistance
- RSI is in the overbought zone
- RSI starts turning down
For Longs:
- Sweep below the support
- RSI oversold
- RSI turns upward
This confirms momentum reversal.
EMA Crossover Confirmation
Use fast EMA + slow EMA (example: 9 & 21):
After sweep:
- Wait for the EMA crossover in the direction of reversal
- Enter on a pullback or the next candle
This confirms the trend shift.
Supertrend Confirmation
After liquidity grab:
- Supertrend flips direction
- Entry on the first candle close with the new Supertrend
This confirms trend alignment.
Example Long Setup
- Price sweeps below support
- Strong rejection candle forms
- RSI exits oversold
- EMA crossover OR Supertrend flips bullish
- Enter Buy
- Stop below the sweep low
- Target next resistance or R:R 1:2+
Example Short Setup
- Price sweeps above resistance
- Rejection candle forms
- RSI turns down from overbought
- EMA crossover OR Supertrend flips bearish
- Enter Sell
- Stop above sweep high
- Target next support
Risk Management (Most Important Part)
Even perfect setups fail without risk control.
Use:
✅ Fixed risk per trade (1–2%)
✅ SL beyond sweep high/low
✅ Minimum Risk:Reward = 1:2
✅ Avoid overtrading
Remember:
Your job is not to win every trade your job is to survive long enough for probabilities to work.
Common Mistakes Traders Make
🚫 Trading every wick
🚫 Entering before confirmation
🚫 Tight stop inside liquidity zone
🚫 Ignoring higher timeframe levels
🚫 Revenge trading after sweep
Avoid these, and your consistency improves instantly.
Final Thoughts
Liquidity Sweeps are not manipulation they are how markets function.
Once you understand that price must collect orders before moving, everything changes:
- You stop chasing breakouts
- You stop blaming the market
- You start waiting for traps
- You trade with logic, not emotion
Combine Liquidity Sweeps with RSI, EMA Crossovers, or Supertrend, and you’ll have a high-probability system built around real market behavior, not lagging indicators alone.